

50s Les Paul Wiring
This guide is based on using our Les Paul wiring kit (CTS pots, Switchcraft® toggle switch/jack, 0.022uF capacitors and Gavitt® braided guitar wire) and covers the popular 50s Les Paul wiring. If you are re-wiring your Les Paul, building your own, or upgrading the electronics on an imported copy then you will find this guide useful.
There is a full wiring diagram at the end of this article and we recommend you study it before starting. We will break this guide into four parts which you can navigate to using the buttons below.
Jump to:
Wiring the harness - controls, capacitors and ground wire
For 50s Les Paul wiring you will need;
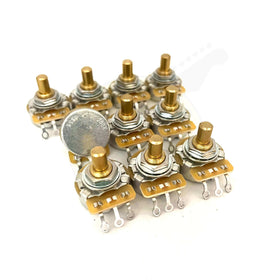
- 4 x CTS 500k audio taper pots (long or short shaft depending on your guitar's top thickness)
- 1 x Switchcraft® toggle switch for Les Paul
- 1 x Switchcraft® 1/4'' mono output jack
- 2 x 0.022uF capacitors
- 5ft Gavitt® braided guitar wire
- 1ft tinned copper wire (1mm diameter)
- 10-15cm heat shrink tubing (3.2mm diameter)
- A wiring template of sorts - use cardboard or anything suitable
Preparation
- As with any soldering and wiring task, you will want to take the time to lightly tin the lugs of the pots and the tips of the wires to be used. Pre-tinning the components before assembly makes an easier and more solid electrical and mechanical connection. Refer to our guide on tinning for a quicker refresh on tinning guitar components.
- Ideally you want a temperature controlled soldering iron. Tin/lead solder melts at 183°C (lead free is higher at 217-223°C) so you want your iron to be anywhere between 350°C and 375°C. Test it out on a few scrap parts and wire before starting to get a feel for the flow of your equipment and solder.
- Keep your soldering iron tip clean and tinned. Use either a damp heat resistant sponge or brass/steel wire shavings. A clean and tinned tip is essential for the correct heat transfer into the joint you are creating.

WIRING THE HARNESS
We will start by wiring the initial harness that slots inside the control cavity. When wiring a Les Paul (or any similar model) it is a lot easier to work outside of the guitar body. There isn't a lot of room in there and you'll be working with a hot soldering iron - better to work in the open where you can see what you're doing and eliminate the risk of burning the finish of your guitar.
To overcome this - you need to make a little jig. You can either buy one of our pre-cut templates or use some cardboard from a used box at home!
STEP ONE
Take the 6'' x 6'' piece of plywood or acrylic (cardboard will do, anything that makes an ideal template and is sturdy enough) and trace the volume and tone controls through the guitar body. Place the template under the guitar and trace through. Then drill the holes to 10mm to accommodate the larger diameter shaft of CTS pots (9.52mm). The idea is to replicate the inside of a Les Paul control cavity as accurately as possible.

STEP TWO
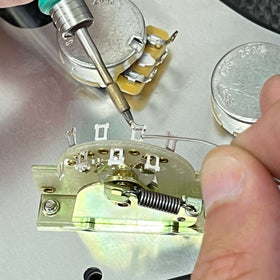
With the template complete, assemble the 4 pots as per the below photo. You can also turn the pots so they are facing/opposite each other. Note - our long shaft 500k pots come with 2 hex nuts, a flat washer and a serrated washer. The first nut is used for height adjustment inside the control cavity. The serrated washer sits in between this nut and the inside of the cavity (ie. the teeth dig into the wood securing it and the pot in place - no one likes a wobbly pot). The dress washer and the second nut are used to tighten the pot from the other side. (So that order again, nut, serrated washer, flat washer, nut).

STEP THREE
Lay down a ground wire connecting each pot together. Using the tinned copper wire provided, lay the ground running from the top left pot (neck volume) clockwise until you reach the bottom left pot of the template (bridge volume) It does not need to be a continuous wire. In fact it is a lot easier to cut the ground wire provided into 3 - as long as each pot is connected. Either solder the ground wire to the back of each pot or to the edge of each pot. By putting it on the edge, you leave more room for grounding the toggle switch and pickup leads on the volume pots which you will do later. It is recommended that you allow for a little bit of slack in the wires in case you miscalculated the dimensions of the template compared to your control cavity.

STEP FOUR
Next, ground the required lugs on each pot. From a birds-eye point of view, these are the first lugs on each volume pot (lug 3), and the middle lugs (output) on the tone pots . You can either use a snippet of ground wire soldered between the lug and the back of the pot or alternatively, bend the lug back onto the pot and solder as we have done in the below photo. Refer to the diagram further down the page for reference.

STEP FIVE
Installing the capacitors - to be a true 50s Les Paul you would need the period correct paper in oil "bumble bee" caps but due to their price (often upwards of £80-£100 a set) countless guitarists, techs and luthiers prefer the orange drop or cheaper alternatives for a fraction of the price. In this setup we are using our SSS Premium PIO capacitors that are available in the wiring kit. The capacitors are connected between the middle lug of the volume pot and the first lug of the tone pots (bottom lugs on our template).

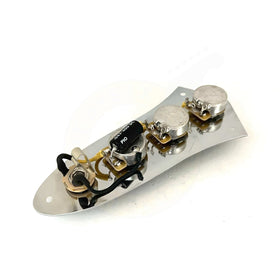
After completing the above steps you should now have the initial wiring harness which will simply drop into your control cavity. The harness is now ready to install into your Les Paul. On to the toggle switch wiring.
WIRING THE TOGGLE SWITCH

Commonly found in the Gibson Les Paul, the Switchcraft 3 way toggle is the switch of choice for countless high end guitars. Here is our guide to wiring it using braided guitar wire - the Gibson way.
You will need;
- 1 x Switchcraft 3-way toggle switch
- 5ft braided push back guitar wire
- 6-10 cm of tinned copper wire (if using our Les Paul wiring kit, this is provided)
- 3.2mm diameter heat shrink tubing (optional but recommended)
- Wire cutters
- 25w-70w soldering iron
- Lead/tin solder (preferably 60/40) or lead free solder (with added silver)
- A flat surface to work on...you do not want to do this inside your guitar.
- 1 x 1.5ft (this goes to the output jack)
- 2 x 1.2ft (these run to the volume pots)
Firstly, you will need to cut the braided guitar wire into 3 lengths (not equal).
- 2ft
- 1.5ft
- 1.5ft
Note - your guitar may vary in length so be sure to double check your lengths before starting. Just run the wire from the switch cavity to the main control cavity - give yourself an extra 2-3cm or so in case you muck up - its better to be too long than too short.
Before we start - a little lesson on braided guitar wire and how it works. It essentially two wires in one. The outer braid acts as the ground whilst the inner cloth wire acts as the hot/live. So the key is to ensure that the braid is pulled back far enough as to not touch the hot wire.

Next - make sure you know what the different lugs on the the toggle switch do. The thickest lug in the middle is the ground. The lugs either side of this are the outputs to the volume controls, whilst the two lugs on the opposite side are the outputs to the jack. These can be bent together as our output jack wire will be connected through both lugs.

STEP ONE
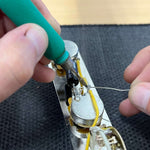
Take the 10cm length of bare ground wire and attach it to the ground lug. Thread it through and bend it round to ensure it makes physical contact with both sides of the lug, make sure it is secure, apply heat and solder. Refer to the below photos.

Next, take one of the two shorter lengths of braided wire you cut earlier, pull the braid back about 2cm and solder the inner core wire to the volume output lug. Ensure you bend it through and around back onto itself to make a solid mechanical connection. Cover the joint with heat shrink tubing as we have below.
STEP TWO
Repeat this process using the second shorter length of braided wire and solder its inner hot wire to the second volume output lug of the switch. Again, if you are using heat shrink tubing, cover the joint. Finally, take the longer wire and pull its braid back about 5cm and solder it to the two output lugs on the opposite end of the switch. It is recommended you take the pliers and squeeze these two lugs as close together as possible - you need to feed the wire through both lugs.

STEP THREE
You should now have 4 wires in total - 1 unshielded ground wire and 3 lengths of braided wire all pulling in the same direction. The final step is attaching the bare ground wire we did in step one to the outer braids of the other three lead wires, thereby grounding the toggle switch. Pull all of the wires in the same direction as if you were installing it inside the guitar. Taking the bare ground wire, wrap it around the outer braid of the other three. Make it nice and snug and solder it from both sides. Use the below photos as a guide.

The switch is now ready to be installed into your guitar and connected to the volume pots and output jack.
INSTALLATION
Fit the toggle switch into its cavity and feed the three braided wires all the way through the body to the main control cavity. Tape them back onto the guitar body for now using masking tape as to not damage or leave any tape residue on the finish.
Re-insert and secure your pickups - again, feed the lead wires through the body to the main cavity. If your pickup lead wires are braided wire, this can be nightmare getting all 5 wires through the body as it can be a little cramped depending on your model. With enough fiddling, you'll get them all through. It's worth it in the end!

Finally, place the prewired harness into the control cavity. Using the nuts you can manually adjust the height of each pot - this is important if you guitar has an arched top and you may actually have to set different heights for each pot to get a uniform appearance on the other side. Its the little details that count.
Using the below 50s Les Paul wiring diagram - install your pickup leads and toggle switch leads to the volume pots. As always when working with braided guitar wire, the outer braid acts as the ground whilst the inner cloth wire is the hot/live. Make sure you pull the braid back far enough and solder the braid to the back of its respective volume pot.

It is a good idea to slightly "puff" out the braid - you want to be able to freely pull the inner wire through without it getting caught. The toggle switch leads gets soldered to the middle lug (output) of the respective volume pot whilst the pickup leads get soldered to the input lug (below the middle lug from a birds-eye view).

Finally, connect the ground wire coming from the tailpiece to the back of the neck volume pot as per the diagram. This wire will already be there if you are re-wiring a Les Paul but if it is your first install, take a 10cm piece of wire which you need to connect to the tailpiece lug that is nearest the volume pot and solder this wire to the back of the pot. This may require drilling a hole running from the control cavity through to the tailpiece stud cavity.
Before you connect the jack socket (next steps outlined below) cover the length of braided wire, the output to the jack socket, with heat shrink tubing to prevent it from touching any of the potentiometer lugs and creating a short. All braids in our guitar are now ground/earth connections. So be sure to insulate it as it runs through the main control cavity.

CONNECTING THE JACK

The output jack on an electric guitar or bass is the gateway - it is essential that it is wired correctly to get a clean connection between the guitar and the amp. If it is not correctly wired, it will either result in some horrific buzz, or no noise at all. This is the "Gibson" style using braided guitar wire as found in stock Les Pauls, SG's Les Paul Junior's etc...
You will need:
- 1/4'' output jack (normally Switchcraft or another reputable brand)
- Your braided guitar wire (that runs from the toggle switch output lug)
- 3.2mm diameter heat shrink rubber tubing or PVC tubing (optional but highly recommended)
- Wire cutters
- 60/40 tin-lead solder (or lead free solder with added silver)
- Soldering iron

It's important to know and identify what lug on the jack does what so you know exactly what wire goes where. The inner ring (in this case with the Switchcraft stamping on) is always the ground. This is also known as the sleeve. The second lug is the live/signal lug, known as the tip. So with braided guitar wire, the outer braid will get soldered to the ground lug and the inner hot/live wire will get soldered to the hot/live lug.

Now, braided wire has been known to be awkward to work with, whether it be soldering the ground to the jack or to the back of volume pots and we get emails each week asking for any tips on how to work with it efficiently. When it comes to the jack, there is one nifty trick in particular. Yes, it is technically push back wire but rather than pushing the outer braid back, it is easier to seperate the inner wire from the braid, by cutting up along the length of it for 2cm or so.
By doing this you can easily twist the seperated braids and then snip off the excess leaving a little tail on the side. This little tail goes into the ground lug hole of the jack and it makes it a lot easier to solder. By bending it through the ground lug hole and back round, we get a solid mechanical connection too.

If you are using heat shrink rubber tubing or a similar form of plastic tubing, feed this down the wire and out of the way for now. It needs to be in place before you solder the joints on the jack however.
With the groundwork done, its time to heat up your soldering iron. So you know that the outer braid goes to the ground lug and the inner black cloth wire goes to the hot/live lug. Start with the hot lug. Push back the black cloth a couple of mm and feed it through the outer lug. Apply heat with the soldering iron and feed the solder wire until the hole is filled. Remove heat and let it cool naturally. It is a good idea to cover this joint with 2cm of heat shrink tubing, just to re-enforce the joint.
This isn't essential by any means but rubber tubing is great if you use coper or aluminium foil as shielding equipment inside the cavity of your guitar - if the outer braid comes into contact with the foil it will create a short circuit.

Next, repeat the same process with the outer braid and the inner ground lug of the jack. Place the edge of the already-cut braid you did earlier through the hole in the lug, apply the heat and feed the solder to complete the joint.

That's how to wire a jack using braided guitar wire. If you've followed the above steps and the other end of the wire is connected to your toggle switch then you're finished and good to go!
That completes our guide to 50s Les Paul wiring - as well as the components used, the position of the capacitors offers a wider tonal range and more use of the tone control which is too often redundant in modern wiring setups. If you are looking for a little more spice, including using push pull pots to coil split your humbuckers, refer to our wiring diagrams page. SoloDallas has a brilliant in depth article on rewiring a Gibson SG from the stock modern wiring to the 50s style and the Seymour Duncan blog has an article explaining the key differences between 50s and modern Les Paul wiring.
More Guides
Copper Shielding - How to Shield a Guitar
Coil Split Les Paul (modern wiring)
Coil Split Les Paul (using tone push pull pots)