

Welcome to our guide on how to wire an SG using our SG wiring kit. There is a video complementing this guide and we recommend you familiarise yourself with a wiring diagram before starting. This guide demonstrates how to wire an SG in the popular “50s” style and is identical to how a Les Paul is wired in the same way. The only difference between the two is the switch is a different shape and the spacing of the components.
Jump To:
Volume Controls and Capacitors
To Wire an SG You Will Need:
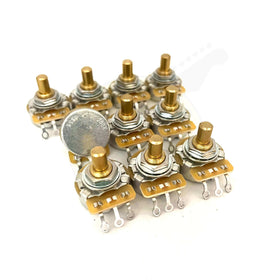
- 4 x CTS 500k audio pots
- 1 x Switchcraft right angle toggle switch
- 1 x Switchcraft long thread jack socket
- 2 x 0.022uF capacitors
- 1ft braided guitar wire
- 1ft push back cloth wire
- 3.5mm hat shrink tubing
- Tinned copper wire (buss wire)
Equipment
- Lead free solder (with added silver)
- 60w soldering iron (preferably temperature adjustable)
- Control cavity template (either sturdy card, acrylic or similar)
Practice and Patience
Soldering can be frustrating and without enough practice, you can easily damage components which will need replacing. If you have any low-quality components lying around, practice soldering on these first to get a feel for the flow of solder and your equipment before tackling the main job.
Template

Start off by making a template of the guitar’s control cavity – you can do the bulk of the wiring job outside of the guitar, giving you more space to work with and minimising the risk of burning the guitar’s finish. Place a piece of sturdy cardboard, acrylic or similar material underneath the control cavity of your guitar and trace through the holes. Once drilled, you have an accurate template of an SG control cavity.
Tinning is Winning
The key to soldering is heat transfer – so keep your soldering tip clean and well tinned throughout the process. Clean it using brass shavings or a damp sponge. Tin the components and wires that need to be soldered. This makes which for a more stable mechanical and electrical connection once the joint is complete.
We are using Gibson style braid for this circuit - braided wire is 2 wires in one and has excellent shielding and space saving properties as a result.

The Switch
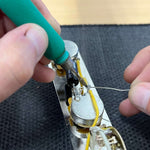
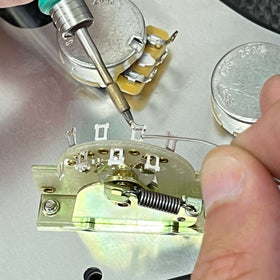
Start off with the switch – identify each solder lug and what they do. The chunky terminal in the middle is the ground lug, the two either side go the volume controls and the two underneath act as the output to the jack socket.

Thread a length of tinned copper wire through the ground lug and solder it in place. Bend it through and back round as per the below photos to ensure a solid mechanical connection.

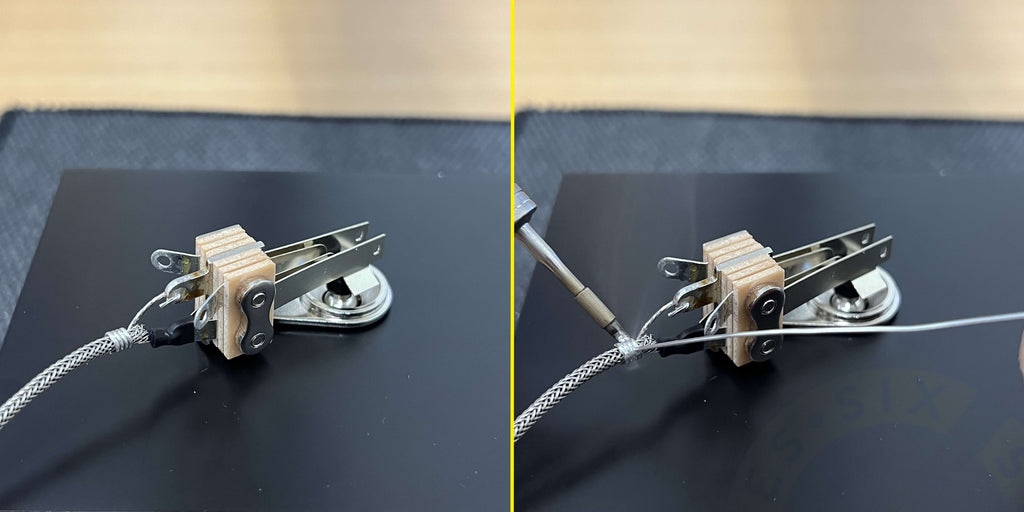
Next, bend the two output terminals for the jack socket together. Take your braided wire and reveal the inner hot/live wire by pushing back the braid and black cloth underneath. Thread the wire through both terminals. Solder in place and cover this with heat shrink tubing. Push the cloth and braid back down.
We need to connect the ground wire to the outer braid (as the outer braid of this wire will get soldered to each pot on its way to the jack socket). Wrap the tinned copper wire around the braided wire and solder it in place. From now on, the outer braid is grounded.
Grounding the Pots
Firstly, we need to ground the terminals on the pots which will not be used.
This is exactly the same as in our Les Paul wiring guide: the third terminal of both volume pots and the middle terminals of each tone pot need to be grounded. Either do this by bending the lug back onto the pot casing and soldering this in place or use a snippet of wire to bridge the two together. Refer to the below photos.

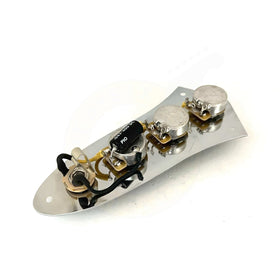
The beauty of using braided wire to wire and SG is that you only need one wire, running from the toggle switch, which then grounds all four pots, before going to the jack socket. We will ground the pots together by soldering the outer braid to each pot casing as it runs past them and on it's way to the jack socket.
Start by tinning the side of the pot casing where you intend to ground the braid. Tin the outer braid as well. With the wire against the pot, apply heat with your soldering iron and slowly flow in some solder to complete the joint.
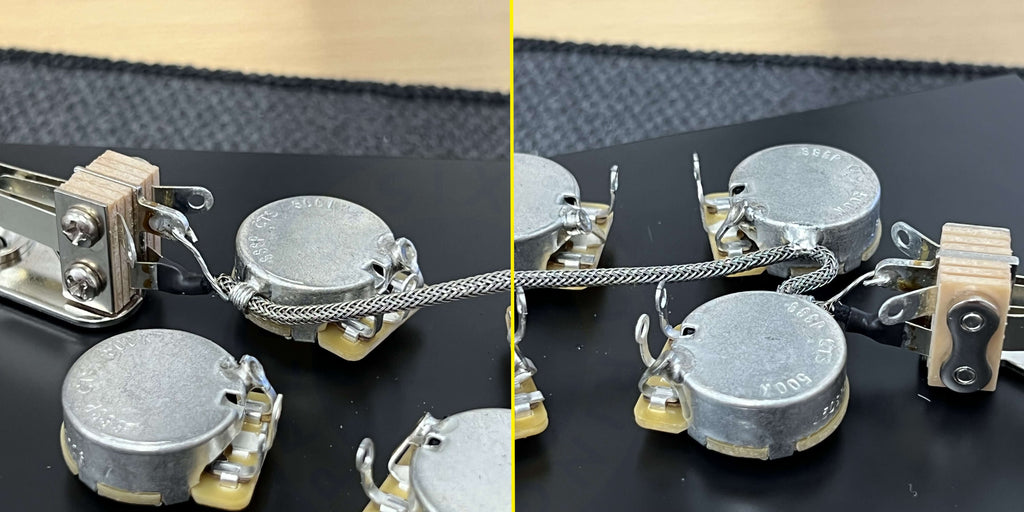
Repeat this process on each pot so that each pot is grounded. It is advisable to cover the outer braid wit heat shrink as it runs down the middle of the 4 pots - remember our outer braid acts as the ground and we don't want it to touch anything it shouldn't on the way through - best to insulate it as per the below photo.

The jack
With all four pots now grounded, its time to connect the jack socket. Separate the outer braid from the cloth wire as show in the below photo. You can either kink the wire (Which creates a hole in the braid) and pull the cloth wire through, or you can cut the braid away - whatever is easier. Leave a small tail of twisted braids.

Mono jack sockets have 2 lugs - the sleeve and the tip. The inner ring is always the sleeve (ground) and the other lug is always the tip (signal)

We will start by soldering the inner cloth (hot/live) wire to the output lug of the jack. Solder this wire in place and cover the joint with heat shrink tubing – this helps to protect the joint from potential shorts but also creates a more robust, durable jack socket. (be sure to push some heat shrink up the wire BEFORE you solder the jack on).

Then, using the little "tail" we created earlier, feed this through the ground lug of the jack socket and bend it back round to create a mechanical connection. Then solder in place.


Volume Controls and Capacitors
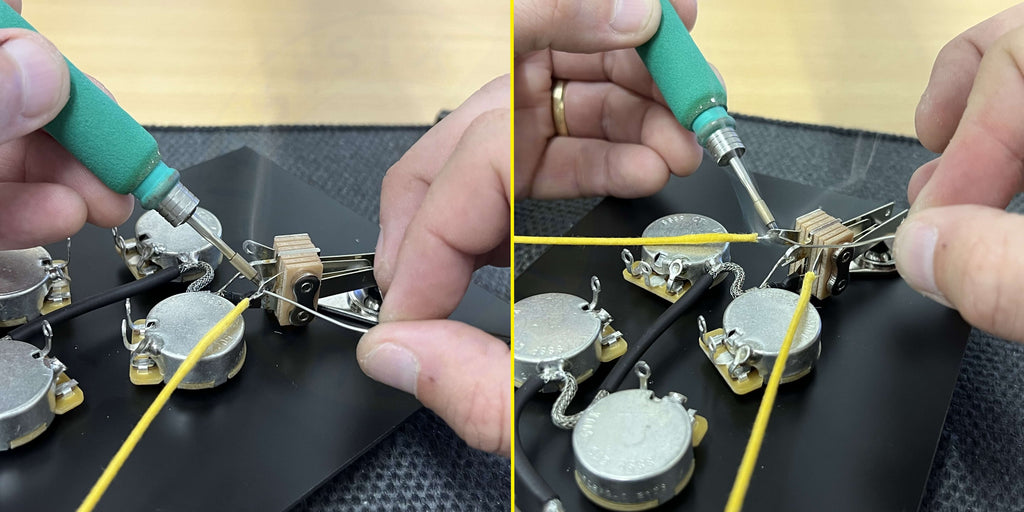
All grounding is now done. We need to connect the toggle switch to the volume controls. Solder a wire to each of the last two remaining lugs on the toggle switch - these go to the output (middle lug) of each volume control respectively.

For your capacitors, we are using 0.022uF but you can fiddle around with different values. A popular approach is to use 0.015uF in the neck position to achieve that “woman tone” when the tone control is rolled off.
For 50s style wiring, as in this setup, the capacitor goes from the middle lug of the volume control diagonally across to the lower lug of the tone pot (from a bird’s eye point of view)

Pickups and Tailpiece Ground Wire
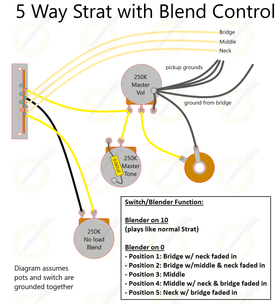
Your pickups go to the input lug (lug 1) on the volume control. Don’t forget to ground each pickup to the back of the pot. Finally, solder the ground wire from the tailpiece or bridge to the back of the neck volume pot or neck tone pot, whichever is nearer. Refer to the below wiring diagram.

That is how to wire an SG – it is essentially the same setup as a Les Paul or an ES-335. You can play around with capacitor values to decide what works best for you. This is wired in the popular “50s” style but you can choose to wire it in the modern style by moving the location of the capacitor.
This SG kit is available from our guitar wiring harness range.

Wiring Guides
How to Wire a Les Paul (50s style)