

This guide will show you how to wire a Jazz Bass using our Jazz Bass wiring kit. Refer to the video and wiring diagram for reference. If you are new to soldering we recommend studying the wiring diagram and viewing the video before starting. It is a very simple circuit to wire - the beauty of Fender instruments is that you can do all of the wiring in the control plate without having to fully disassemble your bass. No thrills, no shrills, just standard jazz bass wiring. Neck volume, bridge volume, master tone.

You will need
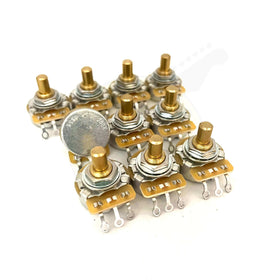
- 3 x 250k solid shaft CTS pots
- 1 x Switchcraft 1/4'' jack socket
- 1 x 0.047uF capacitor (orange drop or paper in oil)
- 1.5ft of guitar cloth wire (any colour)
- Tinned copper wire (buss wire)
Tools and Equipment
- Jazz bass control plate
- Soldering iron (preferably temperature adjustable - 70w)
- Lead free silver solder (or 60/40 tin/lead) solder
- Wire cutters
- Wiring diagram
- Heat shrink rubber tubing 3.5mm and 1.5mm (not essential)

Practice Makes Perfect
If you are a novice when it comes to soldering and guitar/bass wiring, then practice on some cheap components and wire first to get used to the flow of your equipment, your solder, your soldering iron etc... before using quality (more expensive) parts. We've all burned a pot out but you don't want to be continuously spending money on new pots and switches while you learn the basics to soldering!
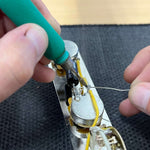
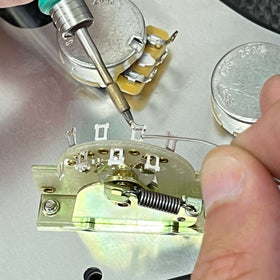
Tinning Is Winning
If you are rewiring your bass, remove the control plate from the body and the stock components. Assemble the new pots and jack into the control plate as per the below photo - have the three pots all facing downwards towards the jack. Spend a good 5 minutes going over the wiring diagram and tinning the jack and pot terminals that will require a solder connection. Tinning beforehand makes for a more reliable mechanical and electrical connection. Heat up the component and flow your solder into the joint. Generally you will want to tin the lugs of the pots which need a connection, the lugs of the jack socket and the sides of the pots if you are adding a ground wire. You will also want to tin the wire ends as well. Tinning reduces the amount of time (and heat) applied to components which can potentially damage them.
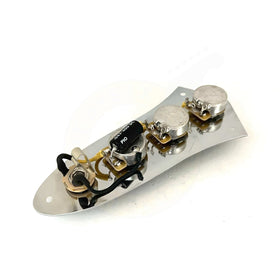
Assembly
Assemble the pots and jack socket as per the below photo - NV (neck volume), BV (bridge volume) and the tone control. The input lug of the tone control is not being used in our circuit, so you can snip this off and out of the way if you want to.

Grounding
As with any guitar or bass - we need a ground circuit. This is made easier due to the fact that our circuit is mounted into a metal control plate.
Our pots and jack socket are grounded to each other already.
Start off by grounding the third lug of each volume pot - do this by filling the eyelet with solder and then bending it back and soldering it to the back of the pot casing. Refer to the below photo. Alternatively, you can use a snippet of wire and solder this between the lug and the back of the pot casing. There is no right or wrong way and both have the same end result.


In the video we refer to laying a ground wire on the side of the pots to connect them all together. This is optional - as mentioned, our pots are already grounded together due to the metal control plate - although there is no harm whatsoever in re-enforcing the ground connection.
Volume Pots
Connect the two volume pots together - use a single wire running from the input lug of the first volume control to the input lug of the second volume control (input lug is the first lug of each pot). The cloth wire can start to fray at the ends - if this bothers you, simply use a little heat shrink tubing to tidy it up. It is a good idea to make a little hook on the end of the wire as per the below photo - creating a hook allows the wire to contact both sides of the solder lug and ensures a solid mechanical connection.


From the second volume control, connect the input lug to the middle (output) lug of the tone control.
On to the jack - connect the outer terminal of the jack (the live terminal) to the middle lug of the tone control. Cover the terminal of the jack with heat shrink rubber tubing to create a more durable jack. This is optional of course - but it is the only reason why we provide heat shrink tubing with the wiring kit.
Again, create a hook on the end of the wire and feed it through the tip (signal lug) of the jack.


Connect the signal wire from the jack socket to the output (middle) of tone tone control, along with the main wire coming from the volume controls. That is the signal circuit done.

Repeat the same process for the ground terminal of the jack - cover the lug with heat shrink tubing and ground the wire to the casing of the tone control. Tin the side of the pot casing first to make an easier connection. You can either ground the jack to the back or the side of the pot casing. Doing it on the side however leaves more room for the capacitor which sits on top of the tone control.
This too is optional - the jack socket is already well grounded via the metal control plate. However, our jack ground connection is the most important ground connection in the whole instrument so there is no harm in re-enforcing the ground connection here. Don't worry - it is not possible to create a ground loop, regardless of what you might read online.

Next, add the tone capacitor. Generally for a bass you will want to use a 0.047uF, although more vintage models would use a 0.05uF or 0.068uF. The capacitor is not polarised, so it doesn't matter which way round you put it in. One lead gets soldered to the outer lug (lug 3) of the tone control, whilst the other lead gets grounded (normally to the pot casing). Again, whilst optional, it is a good habit to bend wires and capacitor leads back onto the lug for a solid mechanical connection.

Solder the capacitor lead in place, and solder the other lead on top of the tone pot casing.

That's the control plate done and dusted! Your pickups get connected to the middle terminal of the volume controls - neck pickup to the first volume middle terminal and the bridge pickup to the second volume control middle terminal.

Don't forget to ground your pickups - normally to the back of each respective volume pot. The ground wire coming from the bridge gets grounded to the back of the pot casing as well.

Time to reassemble your bass and plug in the amp! That's how to wire a Fender Jazz bass. This loaded control plate is available from our prewired harness range.
There are further options and those who want a taste of the wild side can try adding a push pull volume pot which acts as a series/parallel switch for your pickups. In standard jazz bass wiring, the pickups are in parallel with each other, whereas once they are put in series with each other, the overall output and mid-range increases offering a fuller, fatter tone.
Wiring Guides
How to Wire a Les Paul (50s style)